In an era where cybersecurity threats are ever-evolving, having the right tools in your arsenal is paramount. Enter Burp Suite—a versatile tool often likened to a Swiss army knife for penetration testers. From initial reconnaissance to asset discovery and manual endpoint testing, Burp Suite plays a pivotal role in ensuring robust security measures.
However, for those new to the world of penetration testing, setting up Burp Suite can seem daunting. Fear not! This guide is tailored to help beginners seamlessly set up Burp Suite on Windows 10 and 11 without spending a dime.
Here’s a sneak peek into what we’ll cover:
Download and Install: Getting the Burp Suite set up on your machine.
Configuration: Making Burp Suite play nice with Google Chrome.
First Interception: Preparing to intercept your inaugural request.
With the right guidance, you’ll be well on your way to mastering Burp Suite and enhancing your cybersecurity skills.
What is Burp Suite?
Developed by PortSwigger, Burp Suite is an integrated platform tailored for effective penetration testing and vulnerability assessment of web applications. With capabilities ranging from intercepting browser traffic to scanning for vulnerabilities and automating custom attacks, Burp Suite offers a comprehensive toolkit for various stages of the testing process. Its user-friendly interface, combined with powerful features, has made it a favorite among both novices and seasoned security professionals. Whether you’re aiming to identify security loopholes in a web application or delve into the intricacies of web traffic, Burp Suite is the go-to tool that promises precision, efficiency, and reliability.
So with this little introduction of Burp Suite, let’s get you set up!
Setup Burp Suite on Windows
Setting up Burp Suite might seem daunting at first, but with the right guidance, it becomes a straightforward process. Here’s a step-by-step guide to getting Burp Suite up and running on your Windows machine:
1. Download and Install
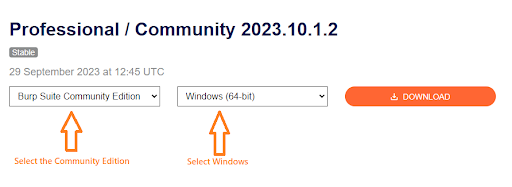
Navigate to Portswigger’s Burp Suite Community edition download page and select the appropriate version for Windows. Follow the prompts to complete the installation.
2. Configuration
Ensure Burp Suite and Google Chrome are configured to work seamlessly together.
3. First Interception
With everything set up, you’re now ready to intercept your first request.
1. Download Burp Suite Installation
In order to download Burp Suite for free, please follow these steps:
- Hit the below link to go to Portswigger’s Burp Suite Community edition download page – https://portswigger.net/burp/releases/community/latest
- On the downloads page, select the Burp Community Edition & operating system as Windows in the dropdown selections. Please refer to the screenshot below.
- Click on Download. The installation setup will start downloading.
- Once the download is complete, double-click the installer file and follow the prompts to complete the installation.
2. Configure Burp Suite to work with Google Chrome
#2A. Turn on Intercept in Burp Suite
- Launch the Burp Suite Community Edition from the Start Menu.
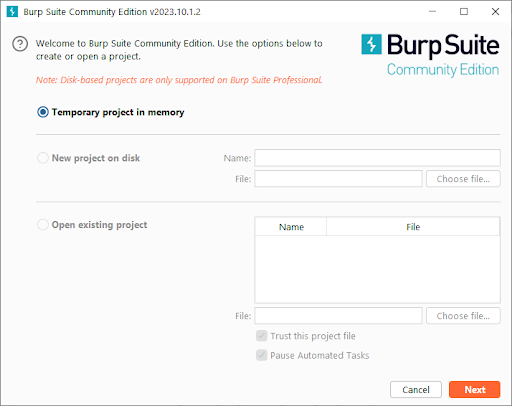
- Proceed with ‘Temporary project in memory” option as in the screenshot below.
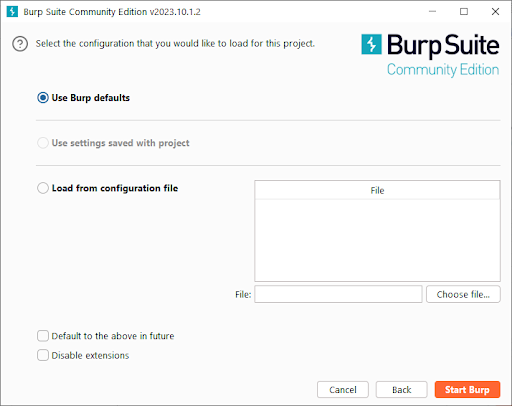
- On the next screen, continue with the first option “Use Burp Defaults” and click on ‘Start Burp”.
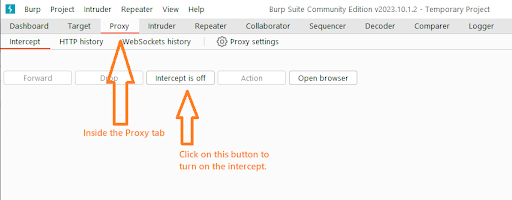
- Burp Suite will start. Go to its “Proxy” tab as in the screenshot below.
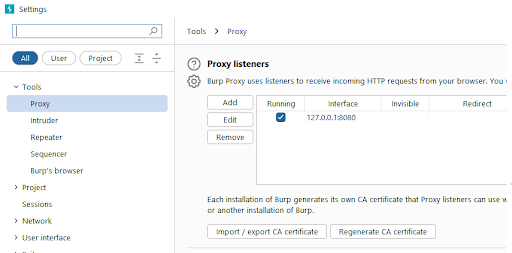
- Now, inside the Proxy tab, go to the “Proxy Settings” subtab and verify the default proxy settings such as IP and port number.
- The default proxy address of Burp Suite is 127.0.0.1:8080. Now, we need to use this proxy address in System settings in the next step.
#2B. Change System Proxy settings to point to Burp Proxy address
- Open settings in Google Chrome Or go to link : chrome://settings/system
- Click on the option “Open your computer’s proxy settings” as below.
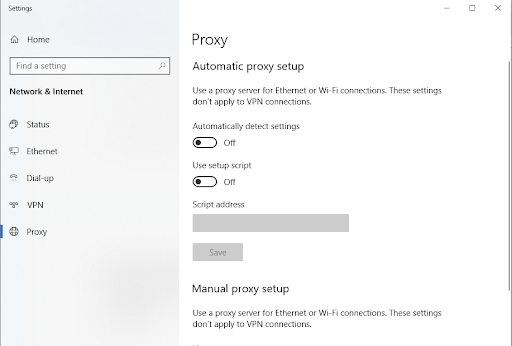
- It will open System Proxy Settings as below:
- Make sure that Automatically detect settings and Use setup script are Off.
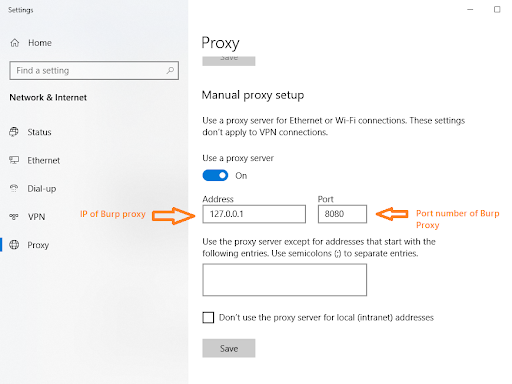
- Set Use a proxy server to On.
- Enter your Burp Proxy listener address in the Address field (by default, 127.0.0.1).
- Enter your Burp Proxy listener port in the Port field (by default, 8080).
- Make sure that Don’t use the proxy server for local (intranet) addresses is unchecked.
- The final setting should look like the below screenshot.
- Click Save.
#2C. Install Burp Suite’s CA Certificate in Chrome
If the web application under test is using https, then you need to use Burp provided CA certificate in Google Chrome so that Burp Suite can decipher the https traffic from the application and also cipher it again so that it can forward it to the application’s server.
Setting up the CA certificate of Burp Suite is a 2-step process viz.
- Export the CA certificate from Burp Suite
- Import the certificate into Google Chrome
Export the CA certificate from Burp Suite
- Make sure that Burp Suite is running.
- Visit http://burpsuite in Chrome.
- On the “Welcome to Burp Suite Community Edition” page, click CA Certificate to download your unique Burp CA certificate.
- Make a note of where you save the CA certificate.
Import the certificate into Google Chrome
- Open Chrome and go to the Customise (hamburger) menu.
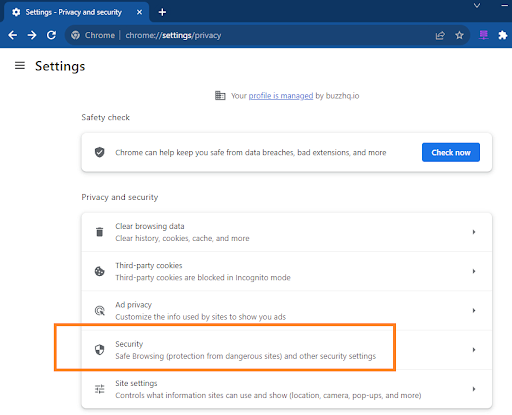
- Select Settings and open the “Privacy and security” menu.
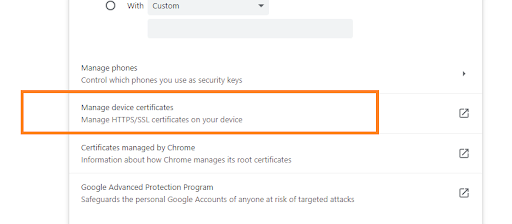
- From the Security menu, select “Manage certificates”.
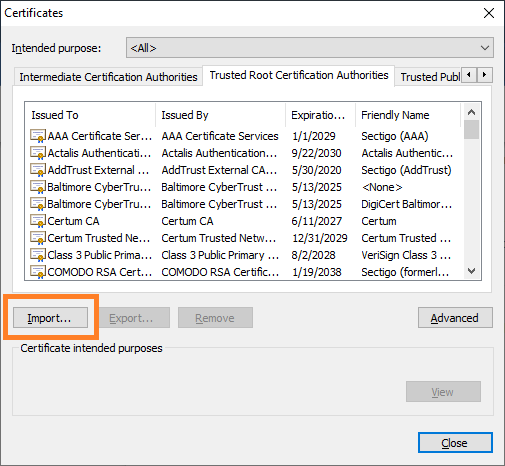
- Select the “Trusted Root Certification Authorities” tab and click Import.
- Click Next, and browse to the CA certificate that you exported from Burp Suite.
- Click open.
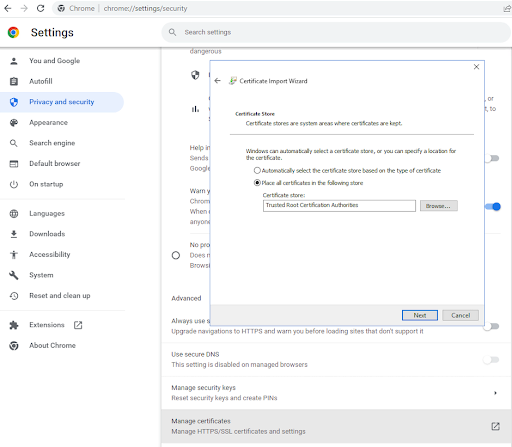
- Make sure that the Trusted Root Certification Authorities certificate store is selected and click Next.
- Click Finish.
- Now restart chrome.
3. Start intercepting the requests in Burp Suite
So far, we have started the proxy in Burp Suite and used it as our System proxy. Additionally, we have set Google chrome to forward the https traffic to burp suite and burp suite CA certificate will take care of cipher and deciphering of the https traffic.
Conclusion
With Burp Suite now set up on your Windows machine, you’re equipped to delve into the world of web security testing. Open any website in Google Chrome, and you’ll see requests being intercepted in the Burp Suite’s Proxy tab. We hope this guide has been insightful and has streamlined your Burp Suite setup process on Windows 10 and 11.
Think like a hacker, secure like a pro with Burp Suite.
For more insights, tutorials, and a community of security-aware developers, visit BUZZ. Together, we will make security accessible to all!


